
Cosplay Tuto
Crafting Epic Props: From Foam to Finishing Touches
Dec
Cosplay, the art of dressing up as beloved fictional characters, has become a thriving subculture celebrated at conventions, gatherings, and online communities worldwide. One of the key elements that elevate a cosplay costume from good to exceptional is the props. Whether it’s a mighty sword, a futuristic blaster, or an ornate staff, these accessories play a crucial role in bringing a character to life. In this comprehensive guide, we embark on a journey through the intricate world of crafting epic cosplay props, from the initial concept to the finishing touches.
Selecting the Right Materials
Choosing the right materials is the first step in creating a successful cosplay prop. The decision you make here will impact the prop’s durability, weight, and overall appearance. When it comes to materials, cosplayers have a plethora of options at their disposal.
One of the most popular choices for crafting cosplay props is foam. EVA foam, in particular, is a versatile and accessible material. It’s lightweight, easy to shape, and can be manipulated to mimic various textures and finishes. Additionally, it’s cost-effective, making it an excellent choice for beginners and experienced prop makers alike.
Wood is another material often used in prop construction. While it provides a sturdy base, it can be heavy and require more advanced woodworking skills. However, for props like shields, staffs, or larger weapons, wood can offer the necessary stability.
Thermoplastics, such as Worbla and Sintra, are favored for their heat-activated molding properties. These materials can be heated and molded into intricate shapes, and they hold their form once cooled. While they can be more expensive than foam, they are ideal for props with intricate designs and details.
For smaller, lightweight props or accessories, 3D printing has gained popularity. It allows for precise and detailed creations, and it’s a perfect choice for cosplayers with access to a 3D printer or access to 3D printing services.
The choice of material ultimately depends on the specific prop you intend to create and your personal crafting skills and preferences. It’s essential to research each material’s strengths and weaknesses to select the one that best suits your needs.
Essential Tools of the Trade
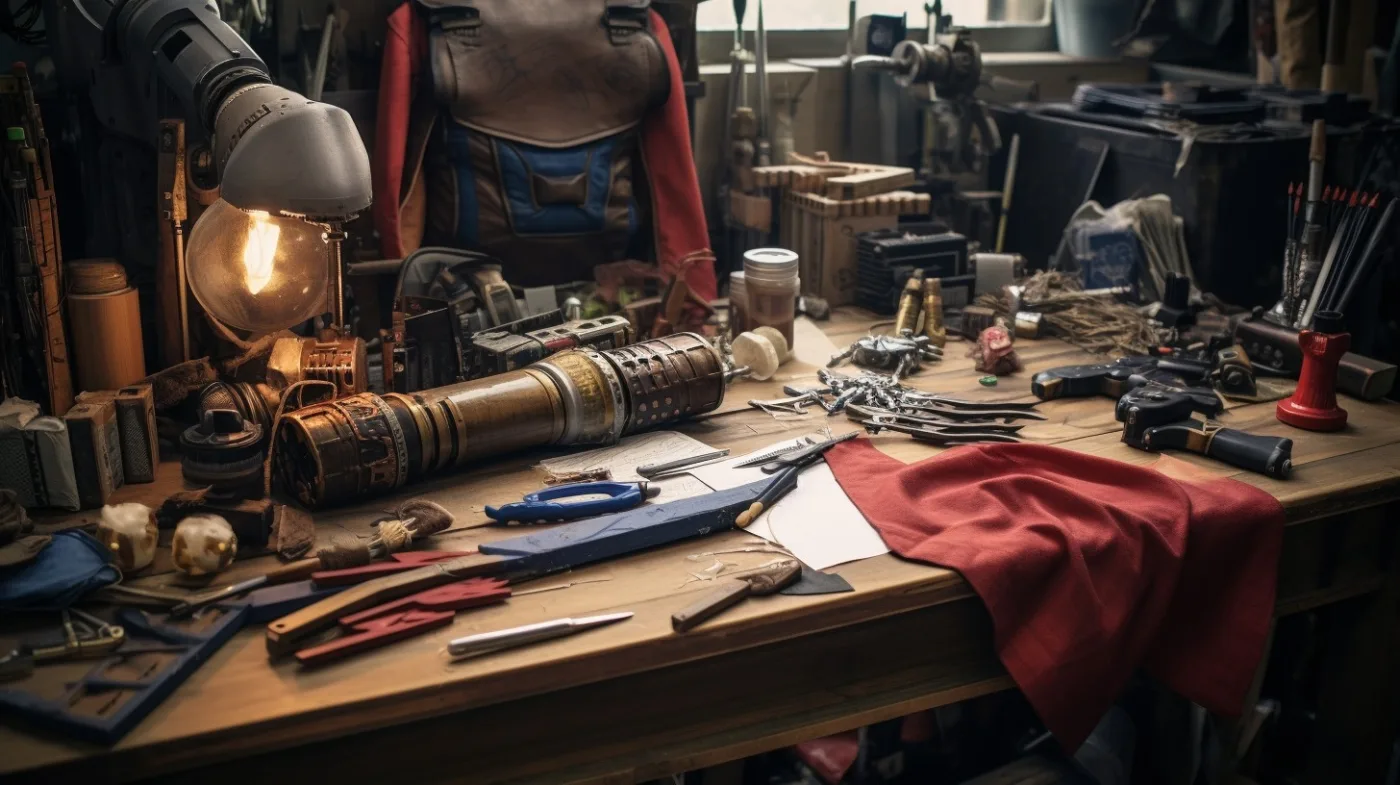
Once you’ve chosen your materials, the next step in crafting epic cosplay props is gathering the essential tools of the trade. Having the right tools will not only make the process smoother but also ensure the safety of your crafting journey.
Basic tools that every prop maker should have include a sharp utility knife or hobby knife for cutting materials, a heat gun for shaping thermoplastics, a hot glue gun for bonding pieces together, sandpaper of varying grits for smoothing surfaces, and a ruler or measuring tape for precision. Safety gear, such as goggles and a respirator, is essential when working with materials that produce dust or fumes.
More advanced tools may include a Dremel rotary tool for detailed carving and shaping, a soldering iron for adding electrical components, and a band saw or jigsaw for cutting larger pieces of material. These tools can be incredibly useful but are not necessarily required for every project.
Creating a dedicated workspace with proper ventilation and organization is crucial. Having a well-organized workspace will save you time and make your crafting experience more enjoyable.
Sketching Your Prop Design
Before diving into the physical construction of your cosplay prop, it’s essential to have a clear plan. Sketching your prop design is a critical step in bringing your vision to life.
Begin by collecting reference images of the character and the prop from various angles. Study the details, colors, and materials used in the original design. This research will help you understand the intricacies of the prop and guide your creative process.
With reference images in hand, start sketching your design on paper or digitally. Pay attention to proportions, dimensions, and any intricate details. This initial sketch serves as your blueprint and will guide you throughout the crafting process.
Consider creating templates for the various components of your prop. Templates make it easier to trace and cut out precise shapes from your chosen material. Depending on the complexity of your prop, you may have templates for blades, handles, or other details.
Sculpting the Foundation
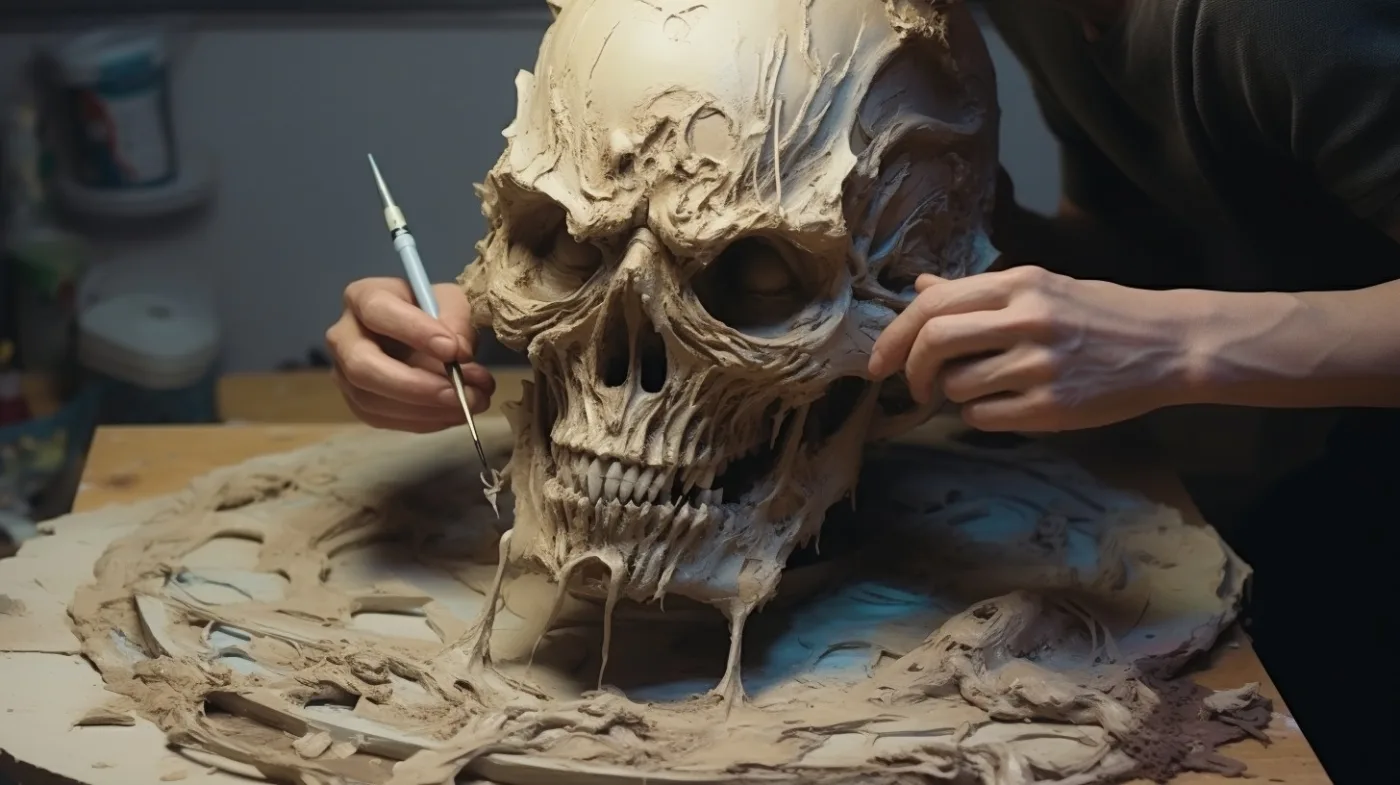
With your design sketched and templates prepared, it’s time to move on to sculpting the foundation of your cosplay prop. This phase involves bringing your design to life by creating the core structure of the prop.
For props made from foam, you’ll start by transferring your templates onto the foam sheets and carefully cutting out the shapes. Use a sharp knife to achieve clean edges. Depending on the thickness of the foam, you may need to layer pieces together to create a more substantial structure.
For wooden props, use your templates to trace and cut the shapes from the chosen wood. Depending on the complexity, you may need to use tools like a jigsaw or band saw to achieve precise cuts. Sand the edges to smooth any roughness.
Thermoplastics require a slightly different approach. Heat the thermoplastic material until it becomes pliable, and then mold it to the desired shape using your templates as a guide. Once the thermoplastic cools and hardens, it will hold its form.
In this phase, focus on achieving the basic shape of your prop. You’ll refine and add details in the subsequent steps. Building a sturdy foundation is essential to ensure your prop is durable and able to withstand the rigors of cosplay conventions and photo shoots.
With the foundation in place, you’re ready to move on to the next stages of prop crafting, which will bring your epic cosplay prop one step closer to completion.
Bonding and Sealing – Ensuring Durability and Stability
Once you’ve sculpted the foundation of your cosplay prop, the next critical step is bonding and sealing the materials. Proper bonding and sealing ensure the durability and stability of your creation, preventing any unwanted separation or damage during use.
For foam-based props, a hot glue gun is a valuable tool for bonding foam pieces together securely. Apply a generous amount of hot glue to the contact surfaces, press them together, and hold them until the glue sets. This creates a strong bond that is less likely to break under stress.
To reinforce your foam prop further, consider using contact cement or EVA foam glue. These adhesives provide a more flexible and durable bond than hot glue and are ideal for attaching foam pieces that need to flex or move.
For wooden props, wood glue is your go-to adhesive. Apply an even coat of wood glue to the surfaces to be joined, press them together, and use clamps to hold them in place while the glue dries. This creates a solid bond that will stand up to handling.
Thermoplastic materials, such as Worbla or Sintra, generally do not require additional adhesives for bonding, as they can be heat-molded to fuse together. However, you can reinforce joints with hot glue or EVA foam glue for added stability.
Sealing your prop is crucial to prevent moisture absorption, which can weaken materials over time. For foam props, seal the surface with a layer of PVA glue or a flexible coating like Plasti Dip. This not only strengthens the prop but also provides a smooth surface for painting.
Wooden props can benefit from a wood sealer or primer, which not only seals the wood but also prepares it for painting. Sand the surface lightly between coats for a smoother finish.
Thermoplastics inherently have a sealed surface due to their heat-molding process. However, you can apply a primer specific to the thermoplastic material for improved paint adhesion.
Smoothing and Sanding – Achieving a Flawless Surface Finish
Achieving a flawless surface finish is essential for bringing realism to your cosplay prop. Smoothing and sanding are crucial steps that help eliminate imperfections and create a polished look.
Start by inspecting your prop for any visible seams, gaps, or rough areas. Use sandpaper of varying grits to smooth these imperfections. Begin with a coarse grit to remove larger blemishes, then gradually move to finer grits for a smoother finish. Be patient and take your time to achieve a seamless surface.
For foam props, consider using a heat gun on a low setting to gently heat the surface. This can help expand the foam and close any small gaps or seams. Be cautious not to overheat and distort the shape of your prop.
Wooden props may require additional attention to achieve a smooth finish. Depending on your desired level of detail, you may need to fill any gaps or imperfections with wood filler. Sand the filler once it’s dried to match the surrounding surface.
Thermoplastic props usually have a relatively smooth surface due to their heat-molding process. However, you can use fine sandpaper to create a consistent texture or to smooth any imperfections that may have formed during shaping.
After sanding, wipe down your prop to remove any dust or debris. This prepares the surface for priming and painting in the next stages of the crafting process.
Priming for Painting – Preparing Your Prop for the Perfect Paint Job
The key to achieving a vibrant and long-lasting paint job on your cosplay prop is proper priming. Priming prepares the surface, enhances paint adhesion, and ensures that the colors appear as intended.
For foam-based props, consider using a primer specifically designed for foam, such as Plasti Dip or Flexbond. Apply a thin, even coat of primer to the entire surface of your prop. Multiple thin coats are preferable to one thick coat, as it minimizes the risk of drips or runs.
Wooden props benefit from a wood primer, which helps seal the wood and create a smooth surface for paint. Apply primer in thin layers, allowing each coat to dry completely before applying the next. Sand lightly between coats for the best results.
Thermoplastic props may require a specific primer formulated for the chosen thermoplastic material. These primers are designed to bond with the surface and improve paint adhesion. Apply the primer evenly and allow it to dry according to the manufacturer’s instructions.
After priming, inspect your prop for any remaining imperfections. If necessary, sand the surface lightly to achieve the desired level of smoothness before moving on to the painting phase.
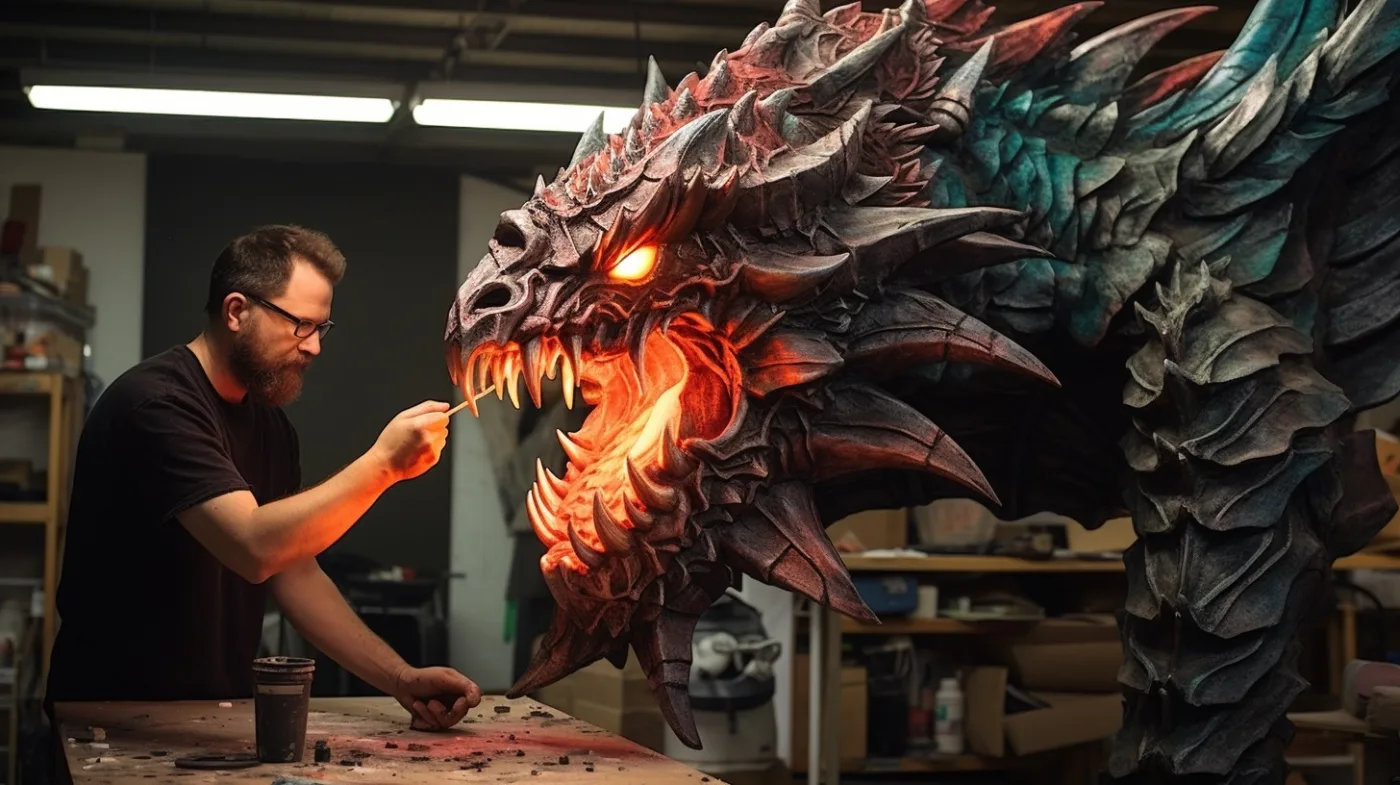
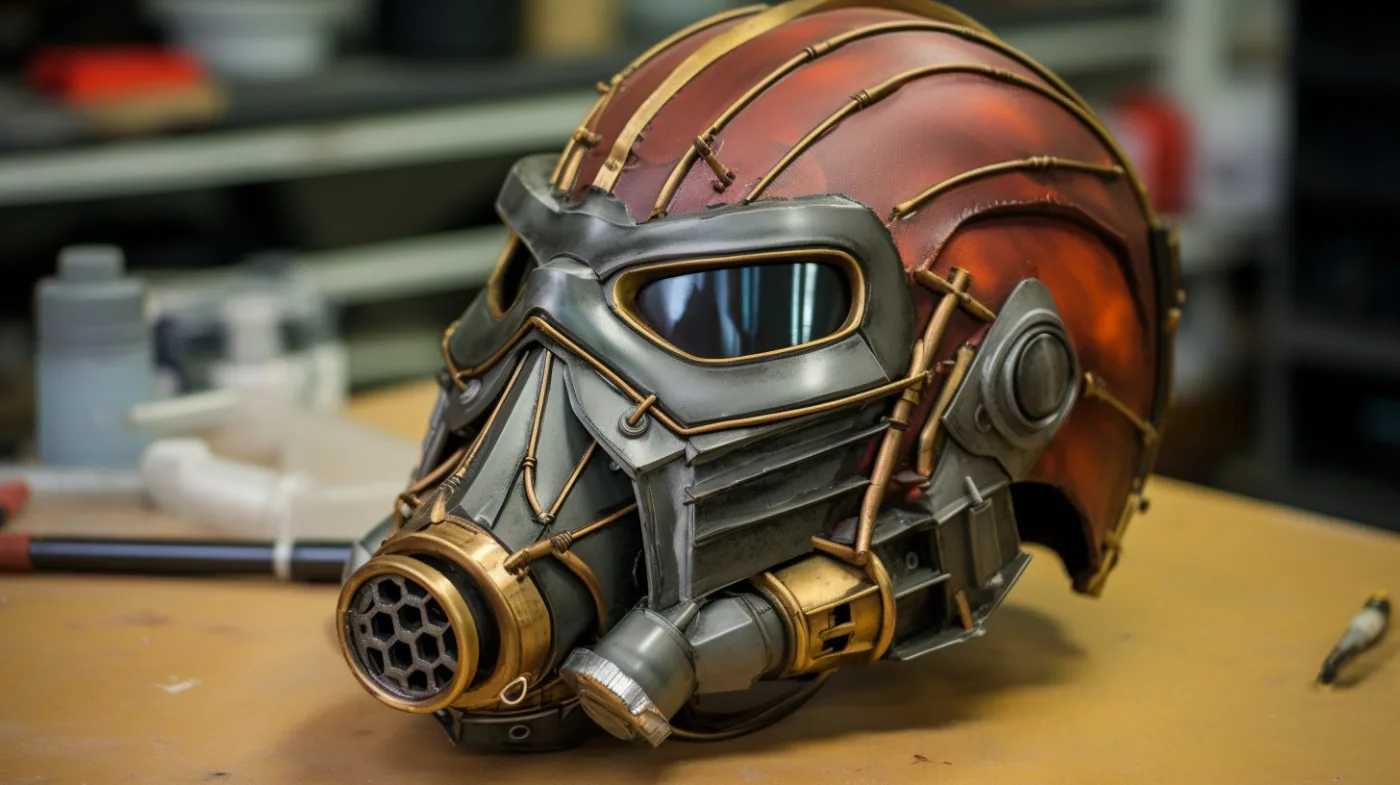
Painting Techniques and Tips – Bringing Your Prop to Life with Color
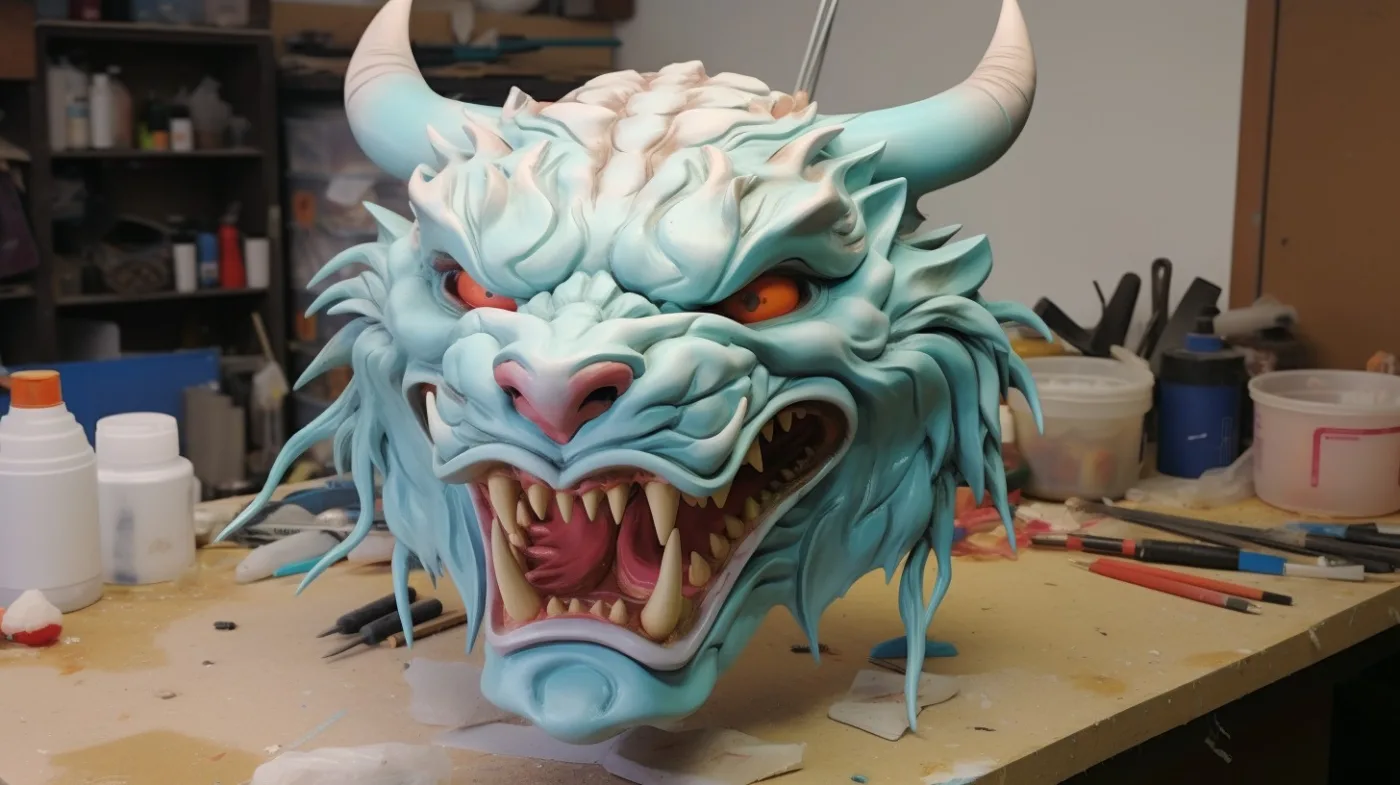
Painting your cosplay prop is where the magic happens, as it breathes life and character into your creation. Whether your prop is battle-worn or shiny and new, painting techniques and tips are crucial for achieving the desired look.
Begin by gathering high-quality acrylic paints in the appropriate colors for your prop. Acrylic paints are versatile and can be diluted with water for various effects. Consider using reference images to match colors accurately.
For foam-based props, start with a base coat of paint, which serves as the foundation for the other colors and effects. Apply multiple thin layers to achieve even coverage and prevent drips or streaks. Allow each layer to dry before applying the next.
Wooden props may benefit from a base coat of primer or a base color that matches the final appearance you’re aiming for. Once the base is dry, layer on additional colors to achieve depth and detail.
Thermoplastic props can be painted using acrylics, but be sure to use a primer compatible with the thermoplastic material. Apply thin layers of paint to build up color and detail.
To create realistic weathering effects on your prop, consider techniques such as dry brushing, stippling, or sponge painting. These methods can add depth, highlights, and shadows to mimic wear and tear.
For metallic or reflective surfaces, metallic paints or spray paints can achieve the desired effect. Apply these paints carefully, as they tend to show imperfections more clearly than matte finishes.
Finally, seal your painted prop with a clear coat or varnish to protect the paint job and add durability. This step is crucial for props that will be handled frequently or exposed to the elements.
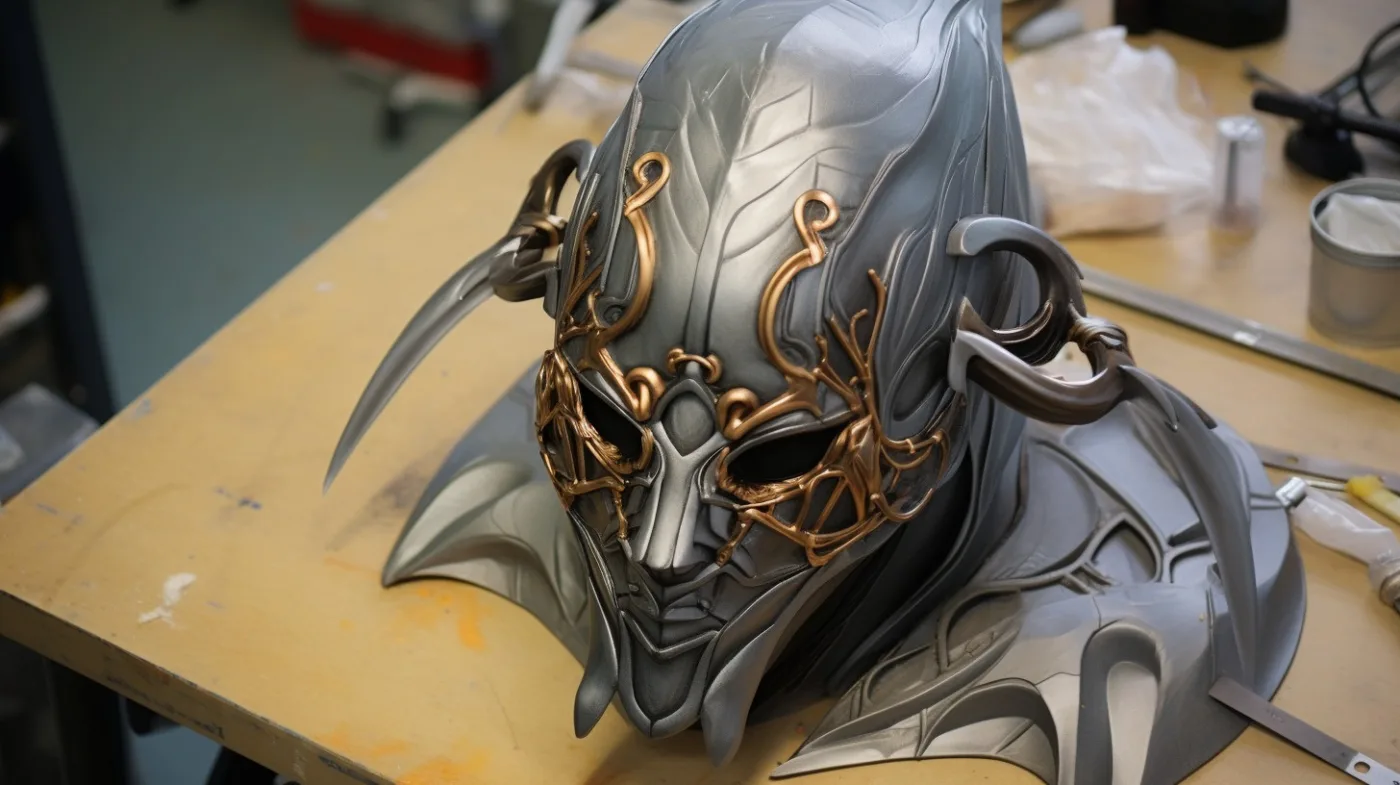
Detailing and Decals – Adding Intricate Touches and Decals
Detailing and decals are the finishing touches that elevate your cosplay prop to the next level of authenticity. These intricate elements capture the essence of the character and add depth to your creation.
Consider using various techniques to add fine details to your prop. Acrylic paints, fine brushes, and steady hands are essential for creating small, intricate designs. Practice your painting skills on a test surface before applying them to your prop to ensure precision.
Decals, stickers, or transfers can be an efficient way to add complex or intricate patterns, logos, or symbols to your prop. Many cosplay stores offer custom-made decals that are easy to apply and adhere well to painted surfaces.
To ensure decals blend seamlessly into your prop, apply them carefully and trim any excess material. Once applied, seal them with a clear coat or varnish to protect them from wear and tear.
Adding weathering effects, such as scuffs, scratches, and battle damage, can further enhance the realism of your prop. Use a fine brush and acrylic paint in darker shades to create these effects, focusing on areas that would naturally show wear.
The detailing and decal stage allows you to fine-tune your cosplay prop and make it truly your own. Take your time and pay attention to the small details, as they can make a significant difference in the overall appearance of your creation.
Protecting Your Masterpiece – Preserving Your Prop’s Quality and Finish
Preserving the quality and finish of your cosplay prop is essential to ensure it stands the test of time and retains its visual appeal. After investing time and effort into crafting and painting your prop, protecting it from wear and environmental factors is crucial.
For foam-based props, a clear, flexible sealant like Mod Podge or clear acrylic sealer can be applied as a protective coat. This clear coat not only shields the paint from abrasion but also provides a glossy or matte finish, depending on your preference.
Wooden props benefit from clear varnishes or polyurethane sealers. These products create a hard, durable surface that resists scratches, moisture, and UV damage. Ensure that the varnish is fully cured before handling your prop.
Thermoplastic props usually have a built-in protective layer due to their heat-molded surface. However, you can still apply a clear topcoat or varnish compatible with thermoplastic materials to add an extra layer of protection and enhance the finish.
Proper storage and transportation are also essential for preserving your prop. Consider investing in padded carrying cases or storage solutions to prevent damage during transit or while in storage. Avoid exposing your prop to direct sunlight or extreme temperatures, as these can cause paint fading and warping.
Regular maintenance, such as cleaning and touch-ups, is crucial to keep your cosplay prop looking its best. Inspect your prop before each use and address any minor damages promptly to prevent them from worsening over time.
Assembly and Customization – Putting It All Together
As your cosplay prop takes shape, the time will come to assemble and customize it, adding the final touches that truly bring your creation to life.
For props with multiple components, such as weapons or equipment, carefully follow your design plan to ensure proper alignment and attachment. Use appropriate adhesives or fasteners that securely hold the components together without compromising the prop’s stability.
Customization options allow you to make your prop unique. You can add fabric or leather wraps to handles, create realistic leather straps, or attach decorative elements like gems, chains, or feathers to match your character’s style.
Consider adding functional features if they suit your character. For example, you can install a trigger mechanism for a prop gun, a button for LED lights, or a hidden compartment for storage.
Take your time with the assembly and customization phase, as it’s your opportunity to add those personal touches that make your cosplay prop stand out and feel truly authentic.
Lighting and Electronics – Incorporating LEDs and Special Effects
For cosplay props that require lighting or special effects, mastering the use of LEDs and electronics is essential to make your creation shine.

LEDs come in various sizes, colors, and shapes, making them versatile for creating different effects. Small LED lights can be embedded into props to simulate glowing runes, futuristic displays, or magical effects. Choose LED colors that match your character’s design and personality.
To incorporate LEDs, you’ll need a basic understanding of electronics, including wiring and soldering. Ensure that you use the appropriate power source, such as batteries or rechargeable packs, and consider incorporating switches or remote controls for easy operation.
Sound effects can add another layer of realism to your prop. Small speakers and sound modules can be hidden within the prop to produce character-specific sounds, like futuristic blaster shots or magical incantations.
The integration of electronics may require some additional planning and space within your prop, so be sure to design your prop with these considerations in mind from the beginning. Additionally, always prioritize safety when working with electronics to prevent any accidents.
Final Quality Check – Ensuring Your Prop Meets Your Standards
Before your cosplay prop is ready for its debut at conventions or photoshoots, it’s crucial to perform a final quality check. This step ensures that every detail is in place, and your prop meets the high standards you’ve set for your craftsmanship.
Begin by reviewing your initial design sketches and comparing them to your finished prop. Ensure that all the planned details, colors, and features are accurately represented. Pay close attention to any deviations from your original concept and make any necessary adjustments.
Inspect your prop under different lighting conditions to identify any imperfections that may not be visible in certain settings. Look for uneven paint coverage, visible seams, or areas where weathering effects may need further refinement.
Test any functional elements, such as moving parts, LED lights, or sound effects, to ensure they work as intended and can withstand regular use.
If you find any issues during your final quality check, take the time to address them before using your prop in public. Whether it’s a touch-up of paint, a minor repair, or adjustments to functionality, these finishing touches will help you present your cosplay prop at its best.
Displaying Your Epic Prop – Showcasing Your Creation at Conventions and Events
Now that your cosplay prop is complete and meticulously crafted, it’s time to showcase your hard work and creativity at conventions and events. Displaying your epic prop effectively is essential to draw attention and admiration from fellow cosplayers and fans.
Consider investing in a custom-made display stand or holder designed specifically for your prop. These stands not only showcase your prop beautifully but also keep it secure and easily accessible.
When setting up your cosplay display, pay attention to the lighting and background. Choose a well-lit area where your prop can be seen clearly, and ensure the background complements your character’s theme. Consider bringing a backdrop or banner that enhances the overall presentation.
Engage with fellow cosplayers and fans by sharing your creative process and the story behind your prop. Networking and connecting with others who share your passion can lead to valuable friendships and collaborations.
Remember to handle your prop with care when displaying it, especially in crowded convention spaces. Be open to questions and admiration from attendees, as this can provide you with valuable feedback and appreciation for your craftsmanship.
By effectively displaying your epic cosplay prop, you can not only share your passion for the craft but also inspire others to embark on their own prop-making journeys.
Troubleshooting and Common Challenges – Addressing Issues Along the Way
As you delve into the intricate world of crafting epic cosplay props, you’re likely to encounter challenges and unexpected issues during the process. Troubleshooting these problems is an essential skill for prop makers, and understanding common pitfalls can help you navigate them more effectively.
One common challenge is achieving smooth and seamless joins between foam pieces or thermoplastic components. To address this, practice precise cutting and shaping techniques, and use filler materials like epoxy putty or Bondo for a flawless finish.
Warped or misshapen props can occur due to heat or pressure during crafting. To correct this issue, consider using heat guns or other heat sources to reshape thermoplastic materials, or clamp and secure components while they cool to prevent warping.
Painting problems, such as paint peeling or uneven coverage, can be addressed by ensuring proper surface preparation, using quality paint products, and applying multiple thin coats instead of a single heavy coat.
Lack of stability or durability may result from inadequate bonding or reinforcement. Always choose the appropriate adhesives and reinforcement materials for your chosen base material, and consider internal supports for larger or more complex props.
Remember that each challenge you encounter is an opportunity to learn and improve your prop-making skills. Don’t be discouraged by setbacks; instead, embrace them as valuable lessons that will help you grow as a prop maker.
Collaborative Projects and Teamwork – The Joy of Working on Group Prop Builds
Collaborative projects in the world of cosplay can be incredibly rewarding, fostering a sense of camaraderie and teamwork among prop makers. Joining forces with fellow cosplayers to work on group prop builds can lead to stunning creations that are bigger and more impressive than what one person can achieve alone.

Working on group prop builds allows for the division of labor, where each member can focus on their specific skills and expertise. This not only accelerates the crafting process but also ensures that each component of the prop is expertly executed.
Communication and coordination are key in collaborative projects. Establish clear roles and responsibilities for each team member, set deadlines, and maintain open channels of communication to ensure everyone is on the same page.
Sharing ideas and brainstorming sessions can lead to innovative solutions and creative designs. It’s a chance to learn from each other and exchange valuable insights into prop-making techniques and materials.
The sense of accomplishment that comes from completing a group prop build is truly special. It’s a testament to the power of teamwork in the cosplay community and can strengthen the bonds among cosplayers who share a common passion for their craft.
Showcasing Your Work – Sharing Your Prop-Making Journey
After investing time, effort, and creativity into crafting epic cosplay props, it’s time to showcase your work and share your prop-making journey with the cosplay community and beyond.
Social media platforms such as Instagram, Facebook, and Twitter are excellent outlets for displaying your creations. Post high-quality photos, progress shots, and behind-the-scenes content to engage with fellow cosplayers and fans.
Consider creating a dedicated website or blog where you can share detailed tutorials, progress logs, and in-depth breakdowns of your prop-making processes. This not only showcases your expertise but also contributes to the cosplay community’s collective knowledge.
Participating in conventions, cosplay events, and photoshoots offers opportunities to display your props in a dynamic and interactive setting. Interact with other cosplayers, photographers, and fans to gain exposure and build a network within the cosplay community.
Online forums and cosplay-specific websites, such as Cosplay.com or DeviantArt, are valuable platforms for sharing your work and receiving feedback from a global audience. Engaging with the online cosplay community can lead to collaborations, friendships, and inspiration for future projects.
By showcasing your work and sharing your prop-making journey, you not only contribute to the growth of the cosplay community but also inspire others to pursue their creative passions and embark on their own prop-making adventures.
The Evolution of Prop Crafting – Embracing New Techniques and Materials
The world of cosplay is continually evolving, with new techniques and materials emerging to push the boundaries of prop crafting creativity. Staying up-to-date with these innovations is crucial for prop makers looking to refine their skills and tackle even more ambitious projects.
One exciting trend is the integration of 3D printing technology into prop crafting. 3D printers allow cosplayers to create intricate and highly detailed prop components with precision. As the technology becomes more accessible, it opens up new possibilities for complex prop designs.

Augmented reality (AR) and virtual reality (VR) are influencing the way props are created and presented. Some cosplayers incorporate AR elements into their props to enhance their visual impact, while others explore VR environments to showcase their creations in immersive settings.
The cosplay community’s emphasis on sustainability and eco-friendly practices is driving the use of recyclable and environmentally friendly materials. Cosplayers are exploring ways to reduce waste and minimize the environmental impact of their creations.
Incorporating electronics and smart technology into props is another exciting avenue for innovation. Cosplayers are adding sensors, Bluetooth connectivity, and interactive features to their props to create captivating and immersive experiences.
As prop crafting continues to evolve, embracing new techniques and materials will be essential for staying at the forefront of the cosplay community. It’s an exciting time for prop makers, as they have the opportunity to explore uncharted creative territory and contribute to the ever-expanding world of cosplay.
Crafting Epic Props – Your Journey Awaits
Crafting epic cosplay props is a journey filled with creativity, challenges, and the thrill of bringing your favorite characters to life. From selecting the right materials to mastering painting techniques, and from collaborating with fellow cosplayers to showcasing your work, the world of prop crafting offers endless possibilities for creativity and self-expression.
As you embark on your prop-making journey, remember that each prop is a unique work of art, a testament to your dedication and passion. Don’t be afraid to push your boundaries, learn from your mistakes, and continue honing your skills.
Whether you’re a seasoned prop maker or just starting out, the world of cosplay prop crafting is a welcoming and vibrant community that celebrates craftsmanship and imagination. Your next epic prop awaits, and your journey is limited only by your creativity and determination.
So, grab your materials, unleash your creativity, and set forth on your own adventure in crafting epic props for the world of cosplay. Your next masterpiece is waiting to be brought to life, and the cosplay community is here to cheer you on every step of the way.